Transformers Introduction
General
In this stage, you wind the input and output transformers that are, respectively, in front of and following the two switches.
Following the installation of the transformers, you will validate their connection/soldering with a series of continuity tests and then you will validate the functioning of the two switches through a series of voltage tests and jumper settings.
You may want to review the detailed techniques for winding and installing binocular transformers.
(go directly to build notes)Transformers Schematic
(Resistor testpoints (hairpin, top, or left-hand lead), as physically installed on the board, are marked in the schematic with red dots)
(Click for Full Schematic)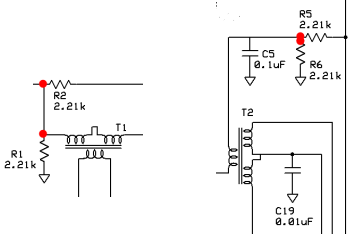 (go directly to build notes)
Transformers Bill of Materials
Stage Bill of Materials
(resistor images and color codes courtesy of WIlfried, DL5SWB's R-Color Code program)
| Check | Designation | Component | Marking | Category | Orientation | Notes | Circuit |
|---|---|---|---|---|---|---|---|
| ❏ | T1 wire | #30 enameled magnetic wire | Misc | 3 lengths of #30, each 7" (18cm) long, should do OK | Transformers | ||
| ❏ | T2 wire | #30 enameled magnetic wire | Misc | primary: one 10" (25 cm) length; secondaries: two 5" (12.5 cm) length should do OK | Transformers | ||
| ❏ | T2 | 8T/2T bifilar BN43-2402 (10") | Xfrmr | Transformers | |||
| ❏ | T1 | 4T #30 trifilar BN43-2402 (7") | Xfrmr | Transformers | |||
| ❏ | T1-core | BN-43-2402 |
 | Binocular core | Transformers | ||
| ❏ | T2-core | BN-43-2402 |
| Binocular core | Transformers |
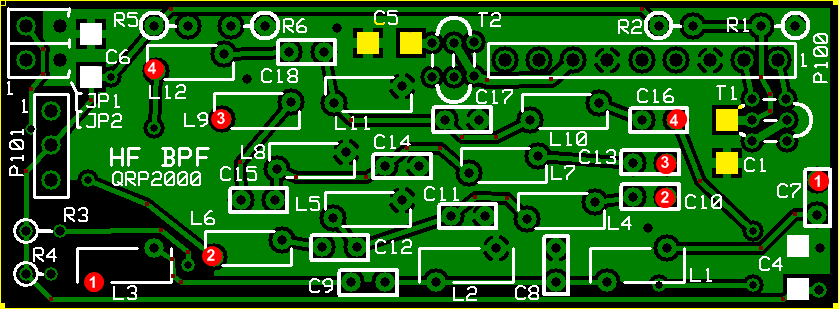
Transformers Summary Build Notes
- Wind and install T1
- Wind and install T2
- Test the Stage
Transformers Detailed Build Notes
Top of the Board

Wind and install T1
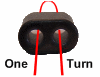
- With binocular cores, going in the bottom, looping around the top, and exiting out the bottom on the other side counts as one turn.
- prepare three 7" lengths of #30 wire and twist them tightly together (3 twists to the inch)
- Wind 4 turns of the trifilar twisted #30 on the BN43-2402 binocular core
- Exercise care in winding the binocular cores to direct the wire into each core hole so that the hard material of the core does not scrape off portions of the wire�s enamel insulation. (It may be advisable to lightly spin with one�s fingers a small drill bit in each of the binocular core hole openings to remove sharp edges that may cut through the enamel insulation of a wire.)
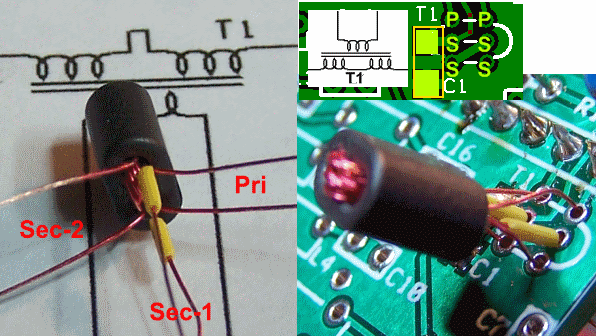
- Note the mounting hole pattern on the circuit board for T1.. The leads from the binocular core should be such that each side (hole) of the core has 3 leads coming out: one primary lead and 2 secondary leads(or 2 primary leads and one secondary lead)
- You will need to identify each winding and identify it as primary, secondary1, and secondary2. One way to "mark" the wires for each winding is to use 3 pairs of hookup wire insulation bits, a different color for each winding. Another way is to cut each winding's leads to different lengths, e.g.: longest is primary, middle length is secondary #1, and so on.
- Before mounting, test to ensure there are no shorts between the primary and secondary windings.
- To provide some structure and standoff distance, it is adviseable to keep a 1/8 ; inch insulation sleeve over the middle set of leads (the first secondary pair) as an integral part of the mounting.
| Check | Designation | Component | Marking | Category | Orientation | Notes |
|---|---|---|---|---|---|---|
| ❏ | T1 wire | #30 enameled magnetic wire | Misc | 3 lengths of #30, each 7" (18cm) long, should do OK | ||
| ❏ | T1 | 4T #30 trifilar BN43-2402 (7") | Xfrmr |
Wind and install T2
- With binocular cores, going in the bottom, looping around the top, and exiting out the bottom on the other side counts as one turn.
- Wind the primary first (primarywinding is 8 turns using 10" of #30 wire)
- Then wind the secondaries (secondary windings are 2 turns, bifilar, using two 5" lengths of #30 wire, twisted together 3 twists (or so) to the inch)
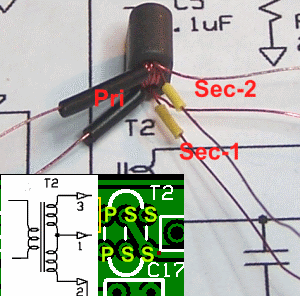
- Note the mounting hole pattern on the circuit board for T2. The two rows of three holes provide the mounting points, from left to right, respectively, of the pairs of primary, first secondary, and second secondary leads..
- A correctly wound T2 will have three leads coming out of each side of the core: two secondary leads (the bifilar windings) and one primary lead. The 3 leads on one side of the core should go into the corresponding "S" (secondary) and "P" holes in the left-hand column of holes for T2 in the picture above. The three leads from the other side should go into the corresponding holes in the right-hand column of holes for T2.
- To provide some structure and standoff distance, it is adviseable to keep a 1/8 inch insulation sleeve over the middle set of leads (the first secondary pair) as an integral part of the mounting.
| Check | Designation | Component | Marking | Category | Orientation | Notes |
|---|---|---|---|---|---|---|
| ❏ | T2 wire | #30 enameled magnetic wire | Misc | primary: one 10" (25 cm) length; secondaries: two 5" (12.5 cm) length should do OK | ||
| ❏ | T2 | 8T/2T bifilar BN43-2402 (10") | Xfrmr |
Transformers Completed Stage
Top of the Board
Transformers Testing
Visual Check
Test Setup
Before condiucting the continuity tests below, using good light and magnification, conduct a thorough visual check of the transformer leads' solder joints, looking carefully for cold solder joints.
Soldering defects are the most common causes of transformers not working correctly
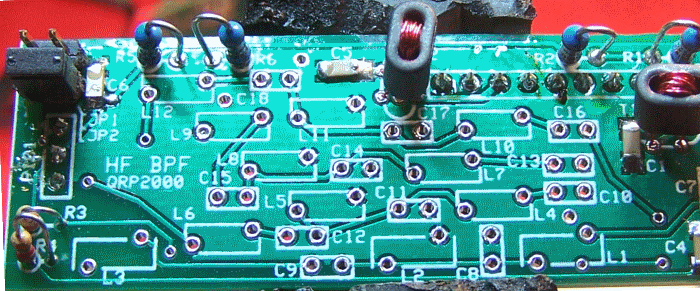
Test T1 Continuity
Test Setup
Take ESD precautions in the secondary windings' tests
- This tests the installation and soldering of the leads for T1 by testing for continuity between points on the bottom of the board which are connected via traces to the appropriate leads of T1
- The test points for the primary winding are marked "P"; the test points for the secondaries are marked "S".
- The primary winding testpoints correspond to pins 1 and 2 of P100 (the antenna input into the board). T1 is right at the antenna input and looks like a DC short. The BPF individual modules use capacitive coupling to the transformer for part of the filtering so they look open (to DC). Thanks to Mike Collins KF4BQ and Daniel Lagerblad for this note.
 Test T1 Continuity"
Test Measurements
| Testpoint | Units | Nominal Value | Author's | Yours |
|---|---|---|---|---|
| Resistance between P and P (Pri; see above) | ohms | 0 | 0 | _______ |
| Resistance between points S and S (sec) | ohms | 0 | 0 | _______ |
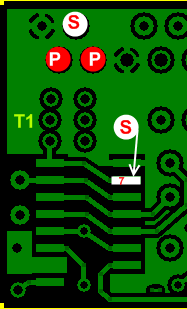
Test T2 Continuity
Test Setup
Take ESD precautions in the primary windings' tests
- This tests the installation and soldering of the leads for T2 by testing for continuity between points on the bottom of the board which are connected via traces to the appropriate leads of T2
- The test points for the primary winding are marked "P"; the test points for the secondaries are marked "S".
Test Measurements
| Testpoint | Units | Nominal Value | Author's | Yours |
|---|---|---|---|---|
| Resistance between P and P (Pri; see above) | ohms | 0 | 0 | _______ |
| Resistance between points S and S (sec) | ohms | 0 | 0 | _______ |
SwitchingTest
Test Setup
This test validates whether the switches are switching correctly for the four different settings of JP1 and JP2.
In each switch, the switched path has approximately 2.5 Vdc available at the two voltage dividers (R1/R2, and R5/R6). Thus, we can test for correct switching by measuring the voltage with respect to ground at each of the test points for U1 and U2.
Testpoints on each successfully switched path will measure 50% of the +5 V power rail
Testpoints on non-switched paths will measure less than 1 Vdc..
Test Setup
- Plug the HF-BPF board into the jacks on the V9.0 board (to get power to the HF-BPF board)
- Apply power to the V9.0 board
- Connect the DMM's COM lead to a ground point
- Measure the voltage with respect to ground of each of the two testpoints for the path chosen (expect 2.5 V on chosen path, < 1 Vdc for other paths)
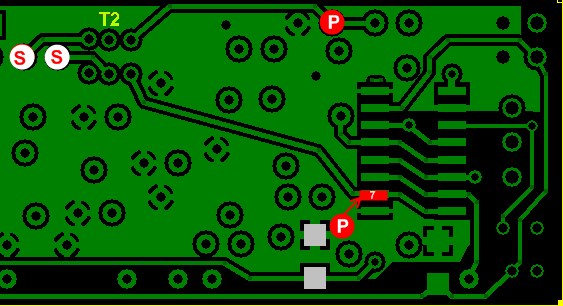
- For example, path 1 has two test points, each indicated as "1" in the graphic below.
Test Measurements
| Testpoint | Units | Nominal Value | Author's | Yours |
|---|---|---|---|---|
| JP1 and JP2 closed - measure testpoint 1 (at L3) | Vdc | 2.5 | 2.48 | _______ |
| JP1 and JP2 closed - measure testpoint 1 (at C7) | Vdc | 2.5 | 2.48 | _______ |
| JP1 Open, JP2 Closed - measure testpoint 2 (at L6) | Vdc | 2.5 | 2.48 | _______ |
| JP1 Open, JP2 Closed - measure testpoint 2 (at C10) | Vdc | 2.5 | 2.48 | _______ |
| JP1 Closed, JP2 Open - measure testpoint 3 (at L9) | Vdc | 2.5 | 2.48 | _______ |
| JP1 Closed, JP2 Open - measure testpoint 3 (at C13) | Vdc | 2.5 | 2.48 | _______ |
| JP1 Open, JP2 Open - measure testpoint 4 (at L12) | Vdc | 2.5 | 2.48 | _______ |
| JP1 Open, JP2 Open - measure testpoint 4 (at C16) | Vdc | 2.5 | 2.48 | _______ |