Dividers Introduction
Theory of Operation
This stage divides the output of the local oscillator by 4 (or, in the case of the 80 and 160m kits, by 8, based on the JP1 setting) and produces the clocking outputs for the Mixer stage.
The output is two signals, in quadrature (i.e., 90 degrees apart), at the desired center frequency, except for the 20m and 15m kits, where the output is one-third of the center frequency. In those kits, the desired center frequency is actually the third harmonic of the divider output frequency.
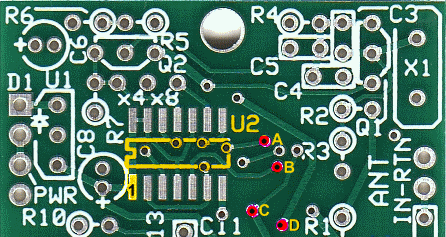
(go directly to build notes)Dividers Schematic
(Resistor testpoints (hairpin, top, or left-hand lead), as physically installed on the board, are marked in the schematic with red dots)
(Click for Full Schematic)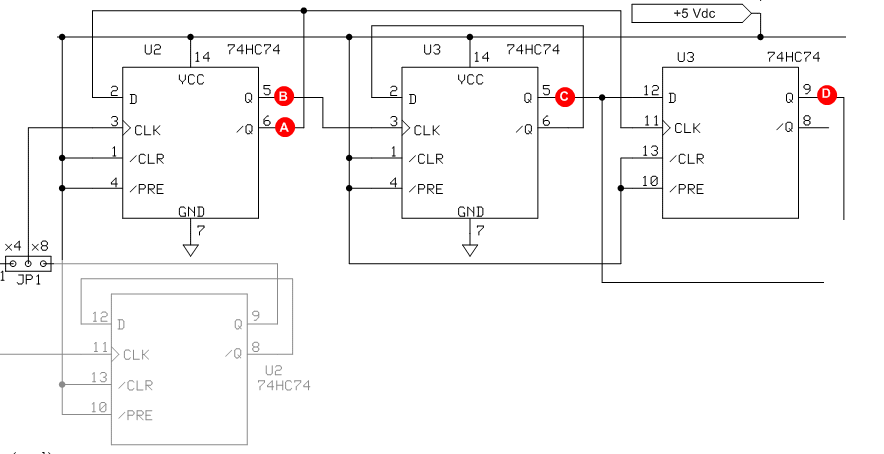
(go directly to build notes)
Dividers Bill of Materials
Stage Bill of Materials
(resistor images and color codes courtesy of WIlfried, DL5SWB's R-Color Code program)
| Check | Designation | Component | Marking | Category | Orientation | Notes | Circuit |
|---|---|---|---|---|---|---|---|
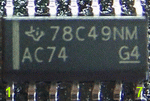
| ❏ | U3 | 74HC74 Dual-D FF | 74HC74
 | SOIC-14 | Dividers | ||
| ❏ | U2 | 74HC74 Dual-D FF | 74HC74
| SOIC-14 | Dividers |
Dividers Summary Build Notes
- Install U2
- Install U3
- Test the Stage
Dividers Detailed Build Notes
Bottom of the Board
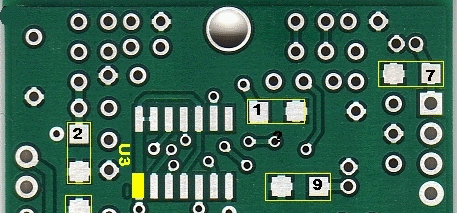
Install U3
Install 74HC74 (U3) on the SOIC-14 pads at the bottom of the board. Take ESD precautions
| Check | Designation | Component | Marking | Category | Orientation | Notes |
|---|---|---|---|---|---|---|
| ❏ | U3 | 74HC74 Dual-D FF | 74HC74
| SOIC-14 | Take ESD precautions |
Top of the Board
Install U2
Install 74HC74 (U2) on the SOIC-14 pads at the top of the board. Take ESD precautions
| Check | Designation | Component | Marking | Category | Orientation | Notes |
|---|---|---|---|---|---|---|
| ❏ | U2 | 74HC74 Dual-D FF | 74HC74
| SOIC-14 | Take ESD precautions |
Dividers Completed Stage
Top of the Board
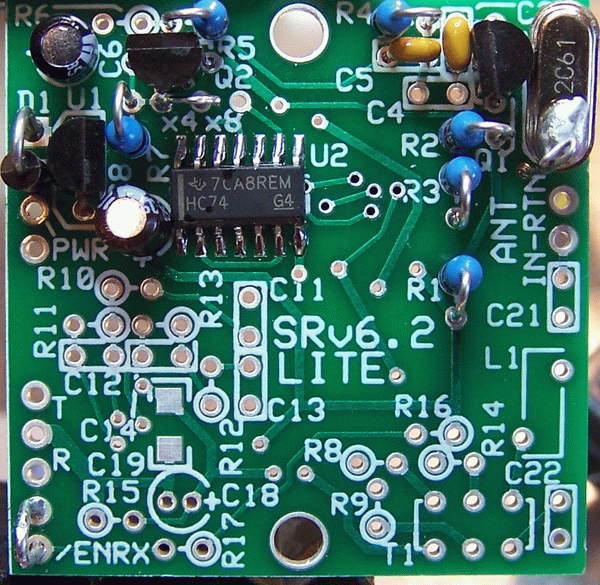
Bottom of the Board

Dividers Testing
Warning
Test Setup
Take appropriate ESD precautions in these tests, since you will be working around the divider IC
Visual Inspection
Test Setup
Using very good lighting and magnification, carefully inspect the solder joints to identify bridges, cold joints, or poor contacts.
Pay especial attention to the joints on the divider IC pins. If necessary, touch up the joints with your iron and/or some flux. Wick up any excess.
Current Draw
Test Setup
- connect a 1k ohm resistor in series with the positive power lead
- apply 9 Vdc and measure the current draw with the limiting resistor in place
- remove the current limiting resistor
- apply 9 Vdc and measure the current draw without the limiting resistor
Test Measurements
| Testpoint | Units | Nominal Value | Author's | Yours |
|---|---|---|---|---|
| Current draw WITH 1k ohm current limiting resistor | mA | < 9 | 6.1 | _______ |
| Current draw without the limiting resistor | mA | 20-30 | 24.4 | _______ |
U2 Pin Voltages
Test Setup
Measure the voltages with respect to ground for each of the pins of U2. Tage care to measure at the actual IC pin rather than the pad, so as to ensure you are measuring the PIN voltage
expected voltages are indicated in the table below:
- 5 V (range of 4.5 - 5.4)
- 2.5 V (approx 50% of the 5B rail value)
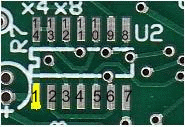
Test Measurements
| Testpoint | Units | Nominal Value | Author's | Yours |
|---|---|---|---|---|
| Pin 1 | Vdc | 5 | 4.92 | _______ |
| Pin2 | Vdc | 2.5 | 2.47 | _______ |
| Pin3 | Vdc | 2.9 - 3.5 | 3.21 | _______ |
| Pin4 | Vdc | 5 | 4.92 | _______ |
| Pin5 | Vdc | 2.5 | 2.44 | _______ |
| Pin6 | Vdc | 2.5 | 2.47 | _______ |
| Pin7 | Vdc | 0 | 0 | _______ |
| Pin8 | Vdc | 2.5 | 2.47 | _______ |
| Pin9 | Vdc | 2.5 | 2.43 | _______ |
| Pin10 | Vdc | 5 | 4.92 | _______ |
| Pin 13 | Vdc | 5 | 4.92 | _______ |
| Pin 14 | Vdc | 5 | 4.92 | _______ |
U3 Pin Voltages
Test Setup
Same instructions apply as for U2
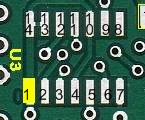
Test Measurements
| Testpoint | Units | Nominal Value | Author's | Yours |
|---|---|---|---|---|
| Pin 1 | Vdc | 5 | 4.92 | _______ |
| pin 2 | Vdc | 2.5 | 2.47 | _______ |
| pin 3 | Vdc | 2.5 | 2.44 | _______ |
| pin 4 | Vdc | 5 | 4.92 | _______ |
| pin 5 | Vdc | 2.5 | 2.45 | _______ |
| pin 6 | Vdc | 2.5 | 2.47 | _______ |
| pin 7 | Vdc | 0 | 0 | _______ |
| pin 8 | Vdc | 2.5 | 2.47 | _______ |
| pin 9 | Vdc | 2.5 | 2.44 | _______ |
| pin 10 | Vdc | 5 | 4.92 | _______ |
| pin 11 | Vdc | 2.5 | 2.47 | _______ |
| pin 12 | Vdc | 2.5 | 2.44 | _______ |
| pin 13 | Vdc | 5 | 4.92 | _______ |
| pin 14 | Vdc | 5 | 4.92 | _______ |
Divider Output
Test Setup
- The divider divides the LO freuqncy by 2, twice. First in U2 and then in U3.
- The first division produces two signals that are at &frac2; the LO freqiency and 180 degrees out of phase with each other
- The second produces 2 frequencies that are at &frac4; of the LO frequency and are 90 degrees out of phase with each other.
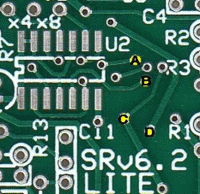
- Using a ham receiver, dial up 28.224 MHz and couple a wire from its antenna to point A and then point B on the graphic below. You should hear the signal in the receiver.
- Dial up 7.056 MHz and similarly couple the wire to point C and then point D, below. You should hear the signal.
Test Measurements
| Testpoint | Units | Nominal Value | Author's | Yours |
|---|---|---|---|---|
| Point A (see above graphic) | MHz | receive at 14.112 | received | _______ |
| Point B (see above graphic) | MHz | receive at 14.112 | received | _______ |
| Point C (see above graphic) | MHz | receive at 7.056 | received | _______ |
| Point D (see above graphic) | MHz | receive at 7.056 | received | _______ |
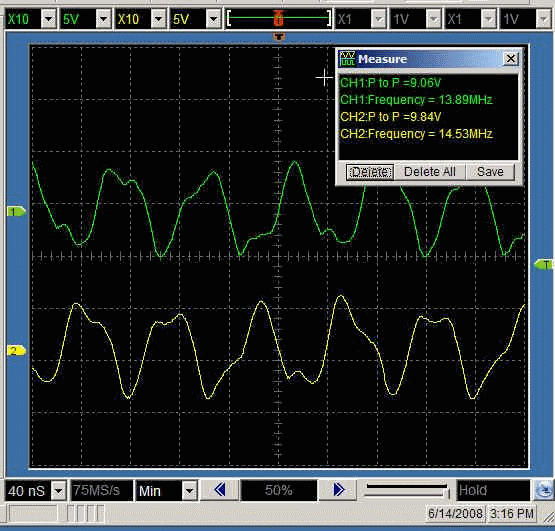
Divider WaveForms - First Division
Test Setup
This test can only be done if the scope used is a good quality, calibrated scope with correctly compensated probes (unlike the author's cheapo scope which encounters excessive overshoot at higher frequencies)
- Set the scope up for dual trace measurement, triggering on Channel 1 (so as to get the phase relationships)
- Poweer up the board
- Place one probe on testpoint A and the other on testpoint B
- use a 10X probe and set the scope magnification to 10x)
- Set the horizontal division to 40 ns and the vertical to 1V p-p per division
- Measure the results
- Should see something similar to the graphic below (14.114 MHz at around 5 Vp-p)
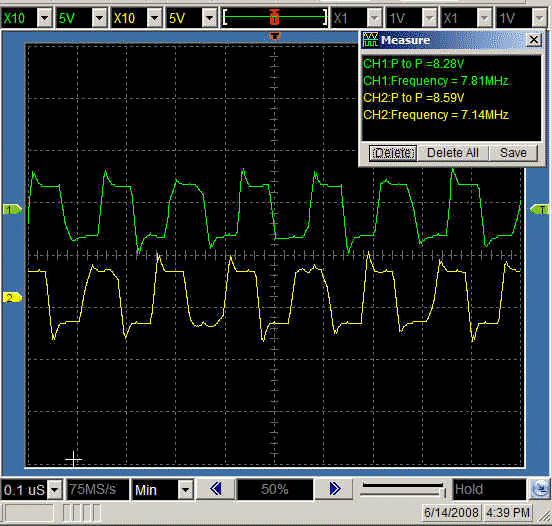
Divider Waveforms - Second Division
Test Setup
- Set the scope up for dual trace measurement, triggering on Channel 1 (so as to get the phase relationships)
- Power up the board
- Place one probe on testpoint C and the other on testpoint D
- Set the horizontal division to 40 ns and the vertical to 5V p-p per division
- use a 10X probe and set the scope magnification to 10x)
- Measure the results
- Should see something similar to the graphic below (7.056 MHz at around 5 V pk-pk)